
I participated in the Modern Quilt Guild’s annual #MQGSwap this year. I really enjoyed swapping with my partner, Valerie, at QuiltCon 2022 in Phoenix.

Participants are assigned a partner and it’s a one to one swap (you are swapping with the person making a quilt for you) where each person makes a mini quilt up to 24” square. Each participant fills out a form with likes and dislikes in terms of colors and technique. Valerie and I learned pretty quickly that we have opposite tastes in colors and technique. We both leaned into what the other likes, stretched our boundaries and stitched out some beautiful results!
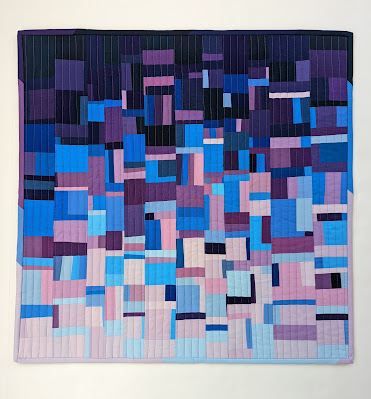
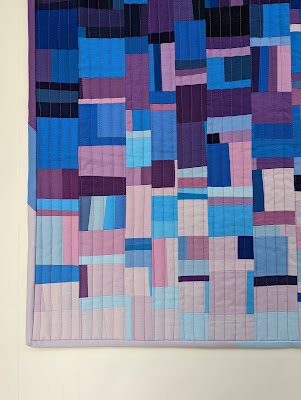
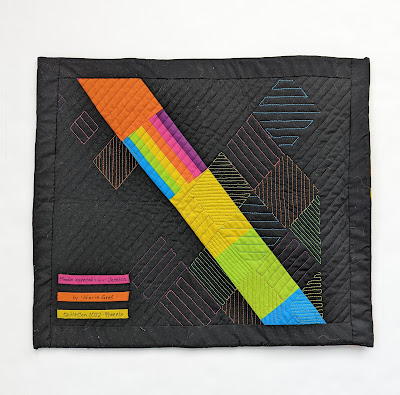
Valerie provided several inspiration photos of quilts she likes. Many of the examples were improv and one particular type of quilt was shown twice. Valerie indicated she liked purples and greens and was recently into blues. I took this information and started pulling lots of fabrics from light to dark in the blue and purple range. I pulled from my scrap bins, FQs, and smaller yardage pieces trying to get the best range I could. I pulled about 25 fabrics and I’m not sure how many different ones ended up in the final quilt, but it’s definitely quite a few!

I wanted to make the piece as close to 24” square as I could. I divided the quilt into columns and gave a general estimated width I was going for – ranging from about 1” to 3” wide. There are 12 columns in the mini quilt. For each column, I stitched ruler-free cut bits and pieces together starting with the darkest pieces at the top and fading to the lightest. After stitching each column, I did use a ruler as a straight edge to trim the sides. I wanted to ensure I wouldn’t end up with overly wavy pieces when the columns were stitched together.
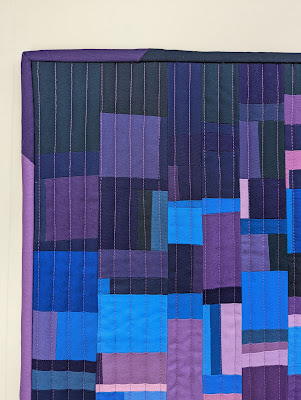
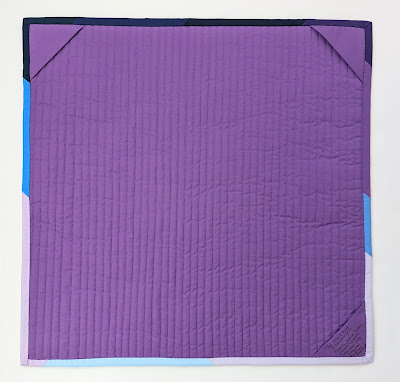
After finishing the top, I cut a solid color medium-range purple fabric for the backing. I pieced a scrappy binding to try and use the same range of color around all sides – darkest around the top, medium on the sides and lightest on the bottom. For the quilting, I wanted the focus to say on the pieced layout, so I went with simple straight line quilting spaced ½” apart. I used Aurifil 50 wt thread in 2540 Medium Lavender.
I am really pleased with the final piece! This is not a style of quilt I typically make but it certainly sparked some new ideas and I look forward to exploring those in the future. Valerie liked the quilt and that was the most important part of this project.
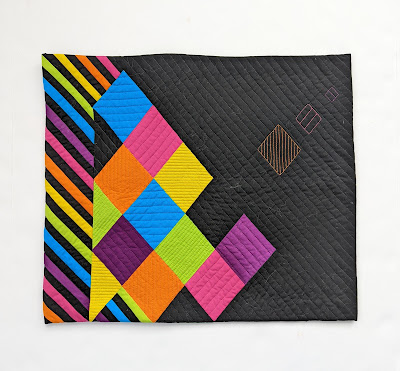
Valerie’s quilt for me is just fantastic! She used all my favorite bright colors and used a dark background which I prefer. Negative space and alternate grid work (which really can be one in the same sometimes) are two of my favorite modern elements and Valerie found such a beautiful way to explore them. She matched thread for her quilting in each bright colored diamond shape, which is a feature I truly love. She also used leftover pieces to construct the backing and I feel like I got two quilts in one! I am so happy to hang this piece in my sewing studio!
Comments
Post a Comment